PanGP: Pan-Genome Profile Analyze Tool
Content Index (version 1.0)
PanGP is a tool for quickly calculating bacterial pan-genome profile. It has integrated two kinds of sample algorithm, so that it could calculate the pan-genome profile of a population with dozens of or hundreds of strains ta extremely low time-cost. At the same time, a user-friendly graphical interface was designed and the image about pan-genome profile could be drawn by PanGP directly.
2. Download and Install
Top ↑
The pre-complied program for Linux and Windows systems and the PanGP source code of are available from the
Download page. Moreover, test data was also provided in the
Download page for beginner to PanGP.
-
For user with Windows system, PanGP could be started by double clicking the PanGP.exe program.
-
For user with Linux system, please make sure that the program PanGP and PanGP.sh were granted with execute permission. If so, just double click the PanGP.sh file to startup the PanGP. The execute permission for PanGP and PanGP.sh could be set with the following command under the root directory in the terminal.
# chmod +x PanGP PanGP.sh
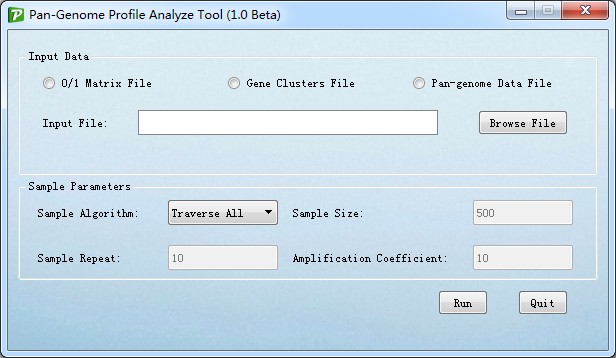
The interface for PanGP was shown as Figure 3.1.
Figure 3.1
In PanGP, three types of data were supported, and they could generate by series of software. And the details for them were introduced as follows.
4.1 Gene Cluster
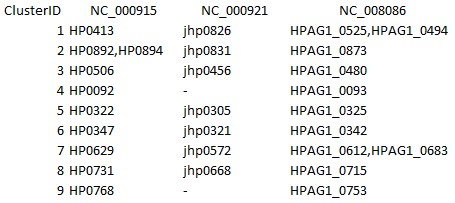
The standard format of gene cluster file for PanGP was shown as Figure 4.1.1.
Figure 4.1.1
The first line (also defined as header in PanGP) was the strains information, and all strains names were tab-delimited. Each line in the following represent a gene cluster and each line begins with an ordered number (the first column in the line, also defined as clusterID in PanGP). If the strain had gene belonging to this gene cluster, the gene name would be listed in the corresponding column of the very strain. If the strain had two or more genes belonging to this gene cluster, all gene names should be comma-delimited and listed in the corresponding column. If the strain did not has gene belonging to the gene cluster, "-" would be marked in the corresponding column.
Alternatively, the first line (header) and the first column (clusterID) were not required for PanGP. Of course, if any of these two kinds of information was absent in the gen cluster file, do NOT forget to check the box on the PanGP interface.
4.2 0/1 matrix
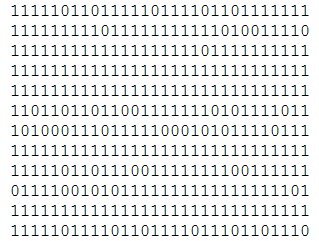
The 0/1 matrix file for PanGP was consisted of 0 and 1, without any other characters. Every row of the file represent a gene cluster, every column represents a strain, and the 1 or 0 in each row means the strain had gene belonging to this gene cluster or not belonging to this cluster respectively. The example for 0/1 matrix file is shown as Figure 4.1.2.
Figure 4.2.1
4.3 Pan-genome data
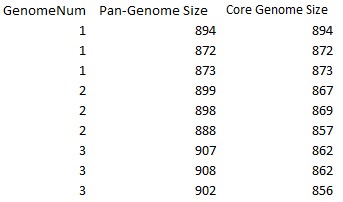
Pan-genome is our defined data type, which was the session data stored by PanGP. The Pan-genome data required a header (the example for pan-genome data was shown as Figure 4.1.3) and it was consisted of three columns, which are the strains number, pan-genome size, and core genome size in turn. With this kind data, PanGP would skip the sample section and go on continued the following program sections. Of course, the sample parameters options on the PanGP interface would be disabled.
Figure 4.3.1
5. Sample parameters
Top ↑
When gene cluster file or 0/1 matrix file was assigned, the options for sample parameters would be enable.
- Sample algorithm: Three kinds of sample methods were provided in PanGP, Traverse All, Totally Random, and Distance Guide. Supposing the total number of strains is N, and when calculated the pan-genome size and core genome size of i strains, there would be C(N,i) combinations consisted of i strains.
- For Traverse All method, whatever how large the number C(N,i) is , pan-genome sieze and core genome size of all the C(N,i) combinations consisted with i strains would be calculated. When this method was selected, the options for sample size and sample repeat would be disabled.
- For Totally Random and Distance Guide methods, when the number C(N,i) > s × r (s is the sample size and r is the sample repeat), s combinations would be sampled from total C(N,i) combinations.
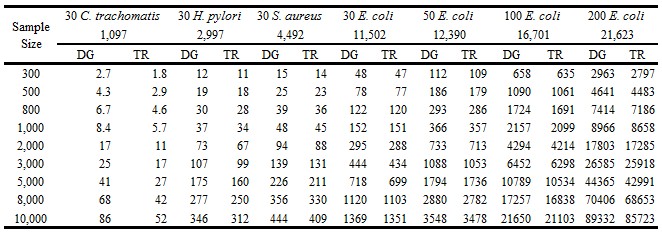
- Sample size: This option works only when the Totally Random or Distance Guide methods was selected. The integer between 200 and 20000 are valid. When a value s was set here, s combinations would be sampled from total C(N,i) combinations with these sample algorithms. As for the value for sample size, the larger the better. Of course, the larger the value of sample size is, the more time would be consumed. Usually, the value between 500 and 1000 would be enough. The time cost for different populations with various population size was listed in Table 5.1.
Table 5.1 Time consuming (seconds) for different populations with various sample size for TR and DG algorithms
- Sample repeat: This option works only when the Totally Random or Distance Guide methods was selected. The integer between 4 and 100 are valid. When a value r was set here, the sample process that sampling s combinations from total C(N,i) combinations, would repeat r times.
- Amplification Coefficient: This option works only when Distance Guide algorithm was selected. The integer between 4 and [Sample repeat] are valid. When a value k was set here, s × k combinations would be sampled from total C(N,i) combinations in the beginning, and s combinations would be sampled from these s × k combinations based their genome diversity. Usually, the value for k could be larger for large scale genomes.
For the full algorithms about Totally Random and Distance Guide, please see the full text of PanGP paper.
6. Pan-genome and core genome analysis
Top ↑
6.1 Visualization for pan-genome and core genome profile
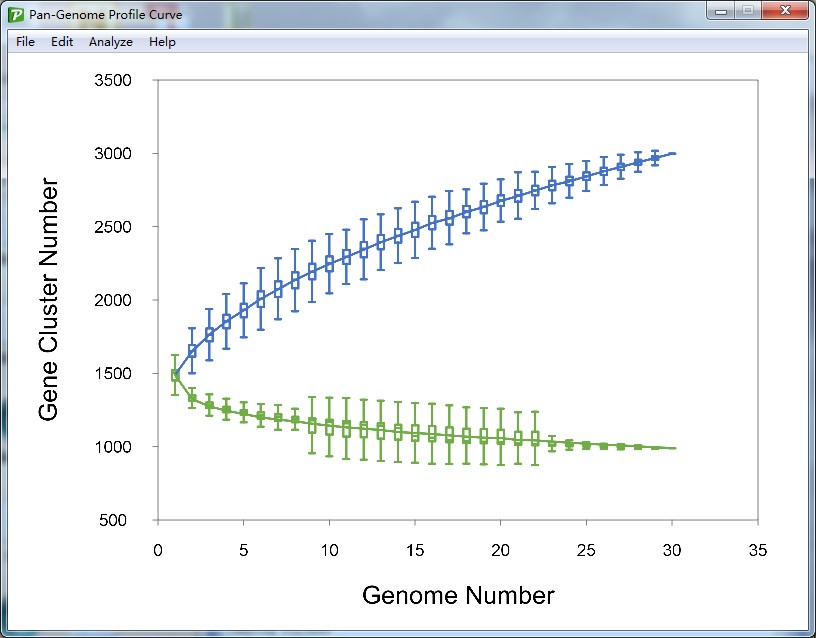
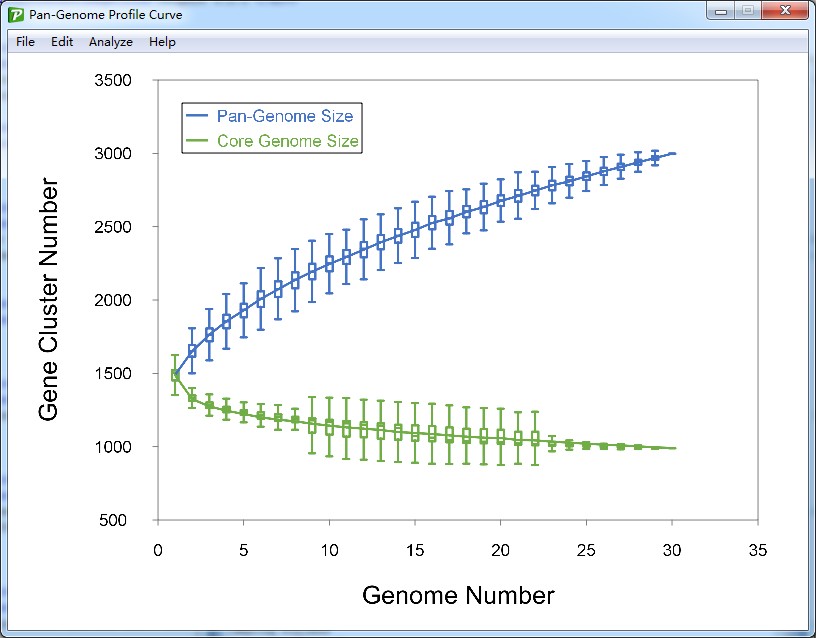
After the sample section is finished, the pan-genome size curve and the core genome size curve would be drawn in a new form (such as Figure 6.1.1). A series custom setting could be performed on the image, and shortcut key for these setting function are also supported.
Figure 6.1.1
6.2 Set curve color
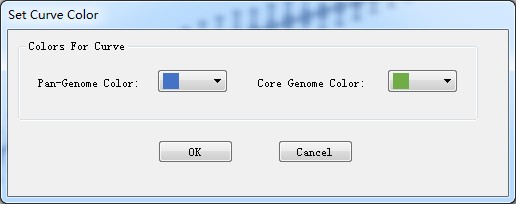
The default color for pan-genome curve and core genome curve could be change with the action button <Set Curve Color> in <Edit> menu, a dialog form would be shown as Figure 6.2.1.
Figure 6.2.1
6.3 Set axis feature
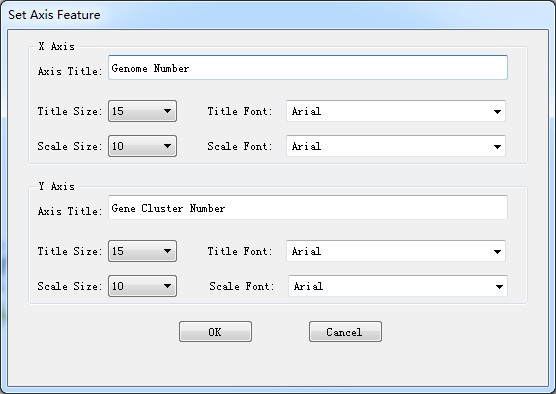
With the action button < Set Axis Feature > in <Edit> menu, the titles, title size, title font family, scale number size and scale number font family for both x axis and y axis could be changed here. The dialog form for set axis feature is shown as Figure 6.3.1.
Figure 6.3.1
6.4 Set legend
The legend for the curve is not shown in the image default and user could append the legend to the image with the action button <Set Legend> in <Edit> menu. After click the button, the cursor would become cross-shaped, and a legend would be shown in the image where the cursor is pressed. The image with legend is shown as Figure 6.4.1.
Figure 6.4.1
6.5 Set Data Model
With the action button <Set Data Model> in <Edit> menu, the image could switch from boxplot to scatter plot or switch from scatter plot to boxplot.
6.6 Set image resolution
The default resolution for the image is 300dpi, user could change the image resolution with the action button <Set Image Resolution> in <Edit> menu. 100dpi, 300dpi, and 600dpi are available.
6.7 Fit curve function
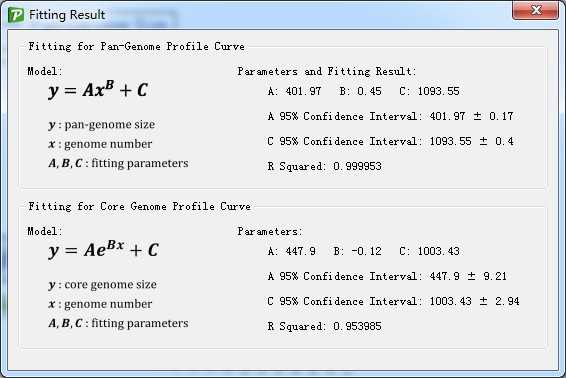
With the action button <Fit curve function> in <Analysis> menu, the relationship between genome number and pan-genome size and core genome size would be fitted with two mathematic models. The fitting report was also provided (such as Figure 6.7.1).
Figure 6.7.1
6.8 Export curve image
Two kinds of image format could be exported from PanGP, PNG (Portable Network Graphics) and TIFF (Tagged Image File Format).
6.9 Save session data
This function could store the sample result into file, which is also known as pan-genome data. With this data, PanGP would skip the sample section and go to the following analysis directly. This function could save lot of time for analyzing the population with large scale strains.
7. New gene analysis
Top ↑
7.1 Visualization for new gene profile
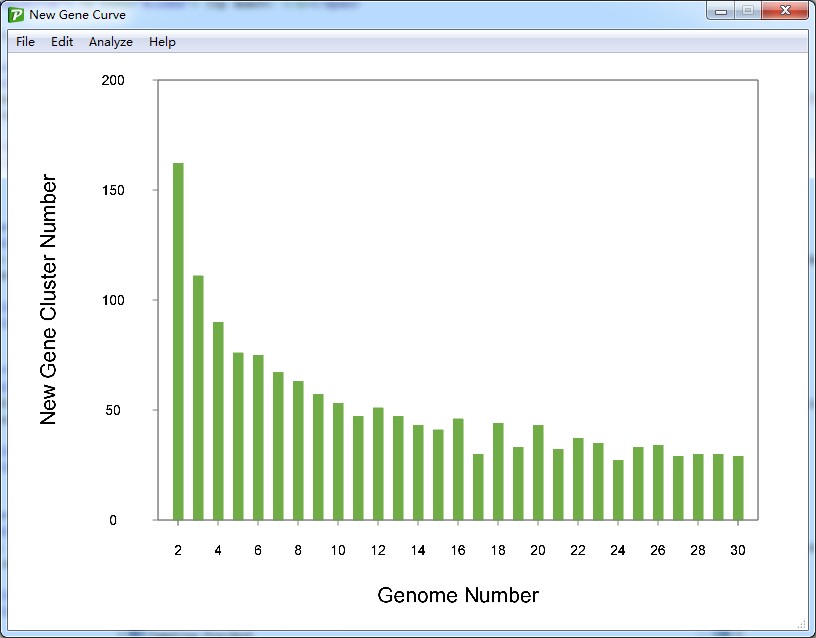
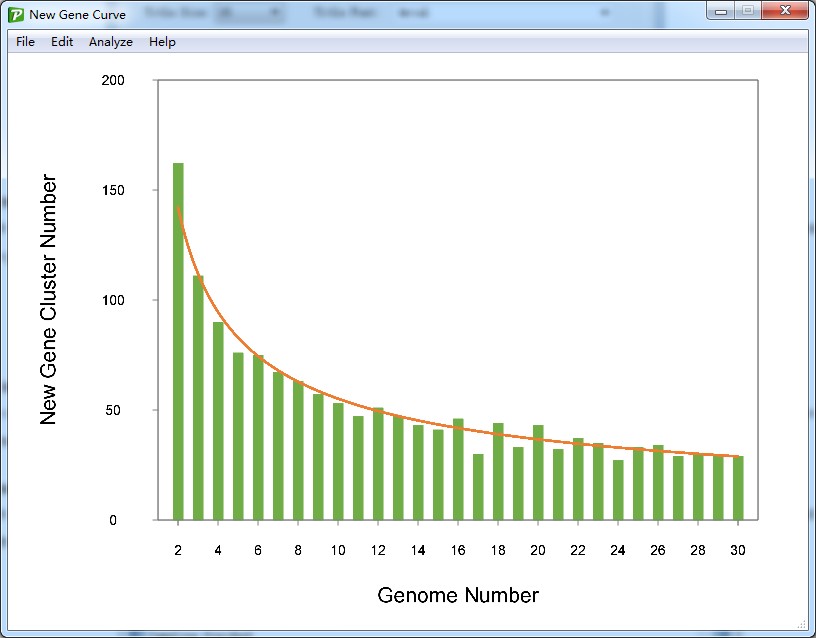
The observed new gene number could be shown by clicking the action button <Draw new gene curve> in the pan-genome profile curve form. The profile for new gene curve would be drawn in the new form. The image for new gene size is shown as Figure 7.1.1.
Figure 7.1.1
7.2 Set curve color
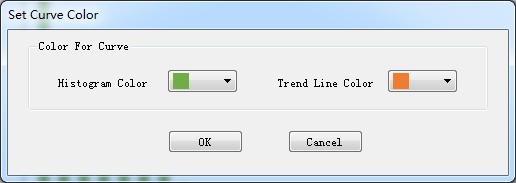
The default color for new gene size histogram and the trend line of new gene size could be change with the action button <Set Curve Color> in <Edit> menu, a dialog form would be shown as Figure 7.2.1.
Figure 7.2.1
7.3 Set axis feature
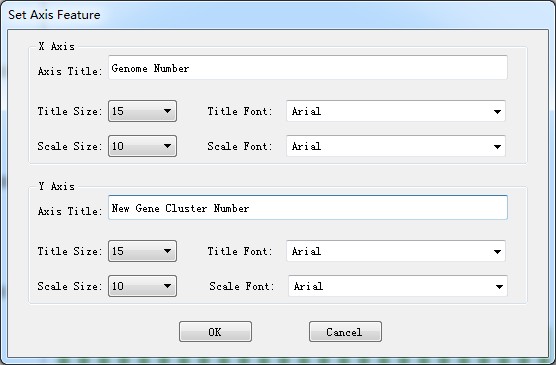
With the action button < Set Axis Feature > in <Edit> menu, the titles, title size, title font family, scale number size and scale number font family for both x axis and y axis could be changed here. The dialog form for set axis feature is shown as Figure 7.3.1.
Figure 7.3.1
7.4 Set trend line
With the mathematic model (which would be mentioned in 7.6 Fit curve function), the trend was calculated to show the relationship between genome number and new gene size. The line was shown as Figure 7.4.1.
Figure 7.4.1
7.5 Set image resolution
The default resolution for the image is 300dpi, user could change the image resolution with the action button <Set Image Resolution> in <Edit> menu. 100dpi, 300dpi, and 600dpi are available.
7.6 Fit curve function
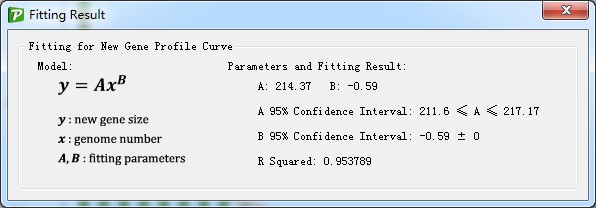
With the action button <Fit Curve Function> in <Analysis> menu, the relationship between genome number and new gene size would be fitted with mathematic model. The fitting report was also provided (such as Figure 7.6.1).
Figure 7.6.1
7.7 Export curve image
Two kinds of image format could be exported from PanGP, PNG (Portable Network Graphics) and TIFF (Tagged Image File Format).
